What is Workbox?
From google workbox site, Workbox is a library that bakes in a set of best practices and removes the boilerplate every developer writes when working with service workers.
importScripts("https://storage.googleapis.com/workbox-cdn/releases/4.3.1/workbox-sw.js");
const precacheManifest = [];
console.log("[Workbox] ######################## Installing ############################")
if (workbox) {
console.log('[Workbox] Yay! Workbox is loaded 🎉');
} else {
console.log('[Workbox] Boo! Workbox did not load 😬');
}
console.log("[Workbox] #################################################################")
Step 6:
Modify the workbox-config.js located in the root directory of the project
module.exports = {
"globDirectory": "build/",
"globPatterns": [
"**/*.{json,ico,html,js,css}"
],
"swDest": "build/sw.js",
"swSrc": "src/workbox-sw.js",
"injectionPointRegexp": /(const precacheManifest = )\[\](;)/
Step 7:
Register service worker, edit index.html file in public/ directory and add the below scripts
<script>
console.log('%NODE_ENV%');
const isProduction = '%NODE_ENV%' === 'production';
if (isProduction) {
console.log('This is a production environment :-|');
} else {
console.log('This is a development environment o-o');
}
if (isProduction && 'serviceWorker' in navigator) {
navigator.serviceWorker.register('sw.js')
.then(registration => console.log('[ service workder ] - Service Worker registered'))
.catch(err => '[ service workder ] - SW registration failed');
}
Step 8:
Modify package.json and add the below script line star-sw
"scripts": {
"start": "react-scripts start",
"build": "react-scripts build",
"test": "react-scripts test",
"eject": "react-scripts eject",
"start-sw": "react-scripts build && workbox copyLibraries build/ && workbox injectManifest workbox-config.js"
Step 9:
run the service worker script which will generate and precache and build the project.
$npm run start-sw
Step 10:
run the compiled and generated project ( if you don't have serve installed run command
$npm install serve -g )
$serve -s build
Step 11:
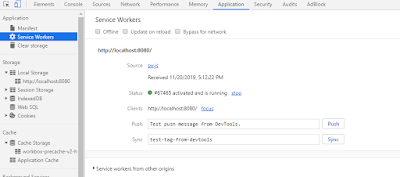
Open your project http://localhost:5000, turn off the network and reload the page and see the magic, it works offline
to see all cached contents go to application tab on your browser,

Additional:
Add your caching strategy in src/workbox-sw.js , for reference how to add strategy follow the below links
https://developers.google.com/web/tools/workbox/modules/workbox-strategies
https://developers.google.com/web/tools/workbox/guides/common-recipes
A sample workbox-sw.js with graphql implementation
From google workbox site, Workbox is a library that bakes in a set of best practices and removes the boilerplate every developer writes when working with service workers.
- Precaching
- Runtime caching
- Strategies
- Request routing
- Background sync
- Helpful debugging
- Greater flexibility and feature set than sw-precache and sw-toolbox
To create service worker with workbox follow the below steps
Step 1:
Create a react app with your preferred tool like create-react-app or npx or yarn
Step 2:
install workbox cli
$npm install workbox-cli --global
Step 3:
Go to the react project directory and then run the below commands
$npm run build // it will compile and create the build folder
$workbox wizard
Then follow the options it asks. ( if you are not sure what to choose pick the default option and hit enter)
You will be presented the below options
? What is the root of your web app (i.e. which directory do you deploy)? (Use ar
row keys)
> build/
public/
src/
──────────────
Manually enter path
? Which file types would you like to precache? (Press <space> to select, <a> to
toggle all, <i> to invert selection)
>(*) json
(*) ico
(*) html
(*) png
(*) js
(*) txt
(*) css
(Move up and down to reveal more choices)
? Where would you like your service worker file to be saved? (build\sw.js)
? Where would you like to save these configuration options? (workbox-config.js)
row keys)
> build/
public/
src/
──────────────
Manually enter path
? Which file types would you like to precache? (Press <space> to select, <a> to
toggle all, <i> to invert selection)
>(*) json
(*) ico
(*) html
(*) png
(*) js
(*) txt
(*) css
(Move up and down to reveal more choices)
? Where would you like your service worker file to be saved? (build\sw.js)
? Where would you like to save these configuration options? (workbox-config.js)
Step 4:
To generate service worker, run
$workbox generateSW workbox-config.js
Step 5:
create a service worker file in /src dirctory name: workbox-sw.js and add the below contents
importScripts("https://storage.googleapis.com/workbox-cdn/releases/4.3.1/workbox-sw.js");
const precacheManifest = [];
console.log("[Workbox] ######################## Installing ############################")
if (workbox) {
console.log('[Workbox] Yay! Workbox is loaded 🎉');
} else {
console.log('[Workbox] Boo! Workbox did not load 😬');
}
console.log("[Workbox] #################################################################")
workbox.precaching.precacheAndRoute(precacheManifest);
Step 6:
Modify the workbox-config.js located in the root directory of the project
module.exports = {
"globDirectory": "build/",
"globPatterns": [
"**/*.{json,ico,html,js,css}"
],
"swDest": "build/sw.js",
"swSrc": "src/workbox-sw.js",
"injectionPointRegexp": /(const precacheManifest = )\[\](;)/
};
Step 7:
Register service worker, edit index.html file in public/ directory and add the below scripts
h<script>
console.log('%NODE_ENV%');
const isProduction = '%NODE_ENV%' === 'production';
if (isProduction) {
console.log('This is a production environment :-|');
} else {
console.log('This is a development environment o-o');
}
if (isProduction && 'serviceWorker' in navigator) {
navigator.serviceWorker.register('sw.js')
.then(registration => console.log('[ service workder ] - Service Worker registered'))
.catch(err => '[ service workder ] - SW registration failed');
}
</script>
Modify package.json and add the below script line star-sw
"scripts": {
"start": "react-scripts start",
"build": "react-scripts build",
"test": "react-scripts test",
"eject": "react-scripts eject",
"start-sw": "react-scripts build && workbox copyLibraries build/ && workbox injectManifest workbox-config.js"
}
Step 9:
run the service worker script which will generate and precache and build the project.
$npm run start-sw
Step 10:
run the compiled and generated project ( if you don't have serve installed run command
$npm install serve -g )
$serve -s build
Step 11:
Open your project http://localhost:5000, turn off the network and reload the page and see the magic, it works offline
to see all cached contents go to application tab on your browser,


Additional:
Add your caching strategy in src/workbox-sw.js , for reference how to add strategy follow the below links
https://developers.google.com/web/tools/workbox/modules/workbox-strategies
https://developers.google.com/web/tools/workbox/guides/common-recipes
A sample workbox-sw.js with graphql implementation
importScripts("https://storage.googleapis.com/workbox-cdn/releases/4.3.1/workbox-sw.js");
const precacheManifest = [];
console.log("[Workbox] ############## Installing #############################")
if (workbox) {
console.log('[Workbox] Yay! Workbox is loaded 🎉');
} else {
console.log('[Workbox] Boo! Workbox did not load 😬');
}
console.log("[Workbox] ########################################################")
workbox.precaching.precacheAndRoute(precacheManifest);
// You might want to use a cache-first strategy for images
workbox.routing.registerRoute(
/\.(?:png|gif|jpg|jpeg|webp|svg)$/,
new workbox.strategies.CacheFirst({
cacheName: IMAGE_CACHE,
plugins: [
new workbox.expiration.Plugin({
maxEntries: 60,
maxAgeSeconds: 30 * 24 * 60 * 60, // 30 Days
}),
],
})
);
// Cache the Google Fonts stylesheets with a stale-while-revalidate strategy.
workbox.routing.registerRoute(
/^https:\/\/fonts\.googleapis\.com/,
new workbox.strategies.StaleWhileRevalidate({
cacheName: GOOGLE_FONT_STYLE_CACHE,
})
);
// Cache the underlying font files with a cache-first strategy for 1 year.
workbox.routing.registerRoute(
/^https:\/\/fonts\.gstatic\.com/,
new workbox.strategies.CacheFirst({
cacheName: GOOGLE_FONT_WEBAPI_CACHE,
plugins: [
new workbox.cacheableResponse.Plugin({
statuses: [0, 200],
}),
new workbox.expiration.Plugin({
maxAgeSeconds: 60 * 60 * 24 * 365,
maxEntries: 30,
}),
],
})
);
// broadcast channel to load new updates
self.addEventListener('install', (event) => {
const updateChannel = new BroadcastChannel('sw-precache-channel');
updateChannel.postMessage({ promptToReload: true });
updateChannel.onmessage = (message) => {
if(message.data.skipWaiting){
self.skipWaiting();
}
};
});
// Workbox with custom handler to use IndexedDB for cache.
workbox.routing.registerRoute(
new RegExp('/graphql(/)?'),
async ({ event }) => {
return staleWhileRevalidate(event);
},
'POST'
);
// Return cached response when possible, and fetch new results from server in chnage
// the background and update the cache.
self.addEventListener('fetch', async (event) => {
if (event.request.method === 'POST') {
event.respondWith(staleWhileRevalidate(event));
}
// TODO: Handles other types of requests.
});
async function staleWhileRevalidate(event) {
let promise = null;
let cachedResponse = await getCache(event.request.clone());
let fetchPromise = fetch(event.request.clone())
.then((response) => {
setCache(event.request.clone(), response.clone());
return response;
})
.catch((err) => {
console.error(err);
});
return cachedResponse ? Promise.resolve(cachedResponse) : fetchPromise;
}
async function serializeResponse(response) {
let serializedHeaders = {};
for (var entry of response.headers.entries()) {
serializedHeaders[entry[0]] = entry[1];
}
let serialized = {
headers: serializedHeaders,
status: response.status,
statusText: response.statusText
};
serialized.body = await response.json();
return serialized;
}
async function setCache(request, response) {
var key, data;
let body = await request.json();
let id = CryptoJS.MD5(body.query).toString();
var entry = {
query: body.query,
response: await serializeResponse(response),
timestamp: Date.now()
};
idbKeyval.set(id, entry, store);
}
async function getCache(request) {
let data;
try {
let body = await request.json();
let id = CryptoJS.MD5(body.query).toString();
data = await idbKeyval.get(id, store);
if (!data) return null;
// Check cache max age.
let cacheControl = request.headers.get('Cache-Control');
let maxAge = cacheControl ? parseInt(cacheControl.split('=')[1]) : 3600;
if (Date.now() - data.timestamp > maxAge * 1000) {
console.log(`Cache expired. Load from API endpoint.`);
return null;
}
console.log(`Load response from cache.`);
return new Response(JSON.stringify(data.response.body), data.response);
} catch (err) {
return null;
}
}
async function getPostKey(request) {
let body = await request.json();
return JSON.stringify(body);
const precacheManifest = [];
console.log("[Workbox] ############## Installing #############################")
if (workbox) {
console.log('[Workbox] Yay! Workbox is loaded 🎉');
} else {
console.log('[Workbox] Boo! Workbox did not load 😬');
}
console.log("[Workbox] ########################################################")
workbox.precaching.precacheAndRoute(precacheManifest);
// You might want to use a cache-first strategy for images
workbox.routing.registerRoute(
/\.(?:png|gif|jpg|jpeg|webp|svg)$/,
new workbox.strategies.CacheFirst({
cacheName: IMAGE_CACHE,
plugins: [
new workbox.expiration.Plugin({
maxEntries: 60,
maxAgeSeconds: 30 * 24 * 60 * 60, // 30 Days
}),
],
})
);
// Cache the Google Fonts stylesheets with a stale-while-revalidate strategy.
workbox.routing.registerRoute(
/^https:\/\/fonts\.googleapis\.com/,
new workbox.strategies.StaleWhileRevalidate({
cacheName: GOOGLE_FONT_STYLE_CACHE,
})
);
// Cache the underlying font files with a cache-first strategy for 1 year.
workbox.routing.registerRoute(
/^https:\/\/fonts\.gstatic\.com/,
new workbox.strategies.CacheFirst({
cacheName: GOOGLE_FONT_WEBAPI_CACHE,
plugins: [
new workbox.cacheableResponse.Plugin({
statuses: [0, 200],
}),
new workbox.expiration.Plugin({
maxAgeSeconds: 60 * 60 * 24 * 365,
maxEntries: 30,
}),
],
})
);
// broadcast channel to load new updates
self.addEventListener('install', (event) => {
const updateChannel = new BroadcastChannel('sw-precache-channel');
updateChannel.postMessage({ promptToReload: true });
updateChannel.onmessage = (message) => {
if(message.data.skipWaiting){
self.skipWaiting();
}
};
});
// Workbox with custom handler to use IndexedDB for cache.
workbox.routing.registerRoute(
new RegExp('/graphql(/)?'),
async ({ event }) => {
return staleWhileRevalidate(event);
},
'POST'
);
// Return cached response when possible, and fetch new results from server in chnage
// the background and update the cache.
self.addEventListener('fetch', async (event) => {
if (event.request.method === 'POST') {
event.respondWith(staleWhileRevalidate(event));
}
// TODO: Handles other types of requests.
});
async function staleWhileRevalidate(event) {
let promise = null;
let cachedResponse = await getCache(event.request.clone());
let fetchPromise = fetch(event.request.clone())
.then((response) => {
setCache(event.request.clone(), response.clone());
return response;
})
.catch((err) => {
console.error(err);
});
return cachedResponse ? Promise.resolve(cachedResponse) : fetchPromise;
}
async function serializeResponse(response) {
let serializedHeaders = {};
for (var entry of response.headers.entries()) {
serializedHeaders[entry[0]] = entry[1];
}
let serialized = {
headers: serializedHeaders,
status: response.status,
statusText: response.statusText
};
serialized.body = await response.json();
return serialized;
}
async function setCache(request, response) {
var key, data;
let body = await request.json();
let id = CryptoJS.MD5(body.query).toString();
var entry = {
query: body.query,
response: await serializeResponse(response),
timestamp: Date.now()
};
idbKeyval.set(id, entry, store);
}
async function getCache(request) {
let data;
try {
let body = await request.json();
let id = CryptoJS.MD5(body.query).toString();
data = await idbKeyval.get(id, store);
if (!data) return null;
// Check cache max age.
let cacheControl = request.headers.get('Cache-Control');
let maxAge = cacheControl ? parseInt(cacheControl.split('=')[1]) : 3600;
if (Date.now() - data.timestamp > maxAge * 1000) {
console.log(`Cache expired. Load from API endpoint.`);
return null;
}
console.log(`Load response from cache.`);
return new Response(JSON.stringify(data.response.body), data.response);
} catch (err) {
return null;
}
}
async function getPostKey(request) {
let body = await request.json();
return JSON.stringify(body);
}


