Home Navigation

Saturday 12 September 2020

ClassNotFoundException vs NoClassDefFoundError

ClassNotFoundException and NoClassDefFoundError both are runtime exceptions. They occur when a class not found in the classpath. 

ClassNotFoundException:

It is a checked exception. It happens when a program tries to load a class using the Class.forName() or loadClass() or findSystemClass() method. For example class.forName("oracle.jdbc.driver.OracleDriver") and oracle jdbc driver is not present in the classpath the program will try to load the class and throw the classNotFoundException.

Resolution: Make sure you add the related dependencies in the classpath.

NoClassDefFoundError:

It is a fatal error and happens when jvm can not find the definition of the class by instantiating (new keyword) and load a class with method call. The definition is present at the compile time but missing at runtime.

It usually happens when there is an exception while executing a static block or initializing static fields of the class, so class initialization fails.

Resolution: Sometimes, it can be quite time-consuming to diagnose and fix these two problems. 

  • Make sure whether class or jar containing that class is available in the classpath.
  • If it's available on application's classpath then most probably classpath is getting overridden. To fix that we need to find the exact classpath used by our application
  •  Also, if an application is using multiple class loaders, classes loaded by one classloader may not be available by other class loaders.

Ref: https://www.baeldung.com/java-classnotfoundexception-and-noclassdeffounderror

Tuesday 1 September 2020

Git stash commands

#git stash save “Your stash message” //Git stash with message

Stashing untracked files
#git stash save -u
or
#git stash save --include-untracked

view the list of stashes you made at any time.
#git stash list

#git stash apply // applies the latest stash stash@{0}

if you want some other stash to apply
#git stash apply stash@{2} // third one

#git stash pop   // applies the latest stash stash@{0} and removes it
#git stash pop stash@{1} // applies the second one and removes it


#git stash show // summary of stash diff of the stash content
#git stash show -p // shows full diff of the stash content
#git stash show stash@{1} // specific stash diff and contents

#git stash branch <name> // creates a new branch with latest stash and removes it
#git stash branch <name> stash@{1} // if you want to specify a stash id

#git stash clear // deletes all the stashes made in the repo
#git stash drop stash@{2} // specify id to delete the stash
 

Monday 20 July 2020

Postgres docker volume backup and restore

They way we are going to backup and restore postgres database docker volume we will use docker exec to get into the container and will use pg_dump utility to achieve our goal.

Postgres volume backup:

start your postgres container using docker or docker-compose.
execute the below command to get the container id
$docker ps

Backup database: 
    $docker exec -u postgres <containerId> pg_dump -Fc -d <databaseName> > dabase-backup.dump

Restore database:
    $docker exec -u <postgresUser> <containerId > psql -c 'DROP DATABASE <databaseName>'

    $docker exec -i -u < postgresUser > <containerId> pg_restore --clean -C -d postgres < dabase-backup.dump


Backup Schema:
    $docker exec -u postgres <containerId> pg_dump -Fc -d <databaseName> -n <schemaName> > schema-db-backup.dump
Restore Schema:
    $docker exec -it -u postgres <containerId> psql 
you will be in interactive mode, in the prompt terminal execute the below commands
    postgres=# \connect bdd
    # drop schema <schemaName> cascade
    # create schema <schemaName>
    \q to quit the interactive mode postgres
    Then execute the below command to reload db
    $docker exec -i -u postgres <containerId> pg_restore --clean -C -d <databaseName> -n <schemaName> < schema-db-backup.dump
Last step, validate your data using a database browser or you can use the below command to get into the database terminal and use sql query to validate your data.

    $docker exec -it -u postgres <containerId> psql 

Friday 10 July 2020

Spring bean life cycle overview

Spring beans are components which are handled and managed by spring IoC container. When the beans get created it is required to perform some initialization to get the beans usable. And when beans are no longer required and gets removed from IoC needs some clean up.

We define beans in three ways
  • XML Config (Load xml definitions ) -> instantiation & constr injection -> property injection
  • Annotation config ( @Component scanning) -> instantiation & @Autowired on constructor -> injection of @Autowired methods & fields
  • Java Config ( Read @Bean method signature ) -> call @Bean method implementations

We can divide the life cycle of a bean as below

Callback Interfaces
  • InitializingBean.afterPropertiesSet() called after properties are set
  • DisposableBean.destroy() called during bean destruction in shutdown
Life Cycle Annotations
  • @PostConstruct annotated methods will be called after the bean has been constructed, but before its returned to the requesting object   
  • @PreDestroy is called just before the bean is destroyed by the container
Bean Post Processors
  • Gives you a means to tap into the Spring context life cycle and interact with beans as they are processed
  • postProcessBeforeInitialization - Called before bean initialization method
  • postProcessAfterInitialization - Called after bean initialization
‘Aware’ Interfaces
  • Spring has over 14 ‘Aware’ interfaces.
  • These are used to access the Spring Framework infrastructure
  • These are largely used within the framework
  • Rarely used by Spring developers


Note: BeanFactoryPostProcessor implementations are "called" during startup of the Spring context after all bean definitions will have been loaded while BeanPostProcessor are "called" when the Spring IoC container instantiates a bean.

BeanFactoryPostProcessor kicks in at the phase of the container life-cycle, when no bean has been created but the bean definition has already been parsed, while BeanPostProcessor comes into play after bean creation.

Thursday 9 July 2020

Spring mvc life cycle summary


  • First request lands to the different sort of filters and it applies to all request. eg, application provided filters, authentication filters etc
  • The DispatcherServlet consults with the HandlerMapping 
  • Handler Mapping resolves controller to invoke. Usually org.springframework.web.servlet.mvc.method.annotation.RequestMappingHandlerMapping is used. This class reads @RequestMapping annotation from the Controller and uses the method of Controller that matches with URL as Handler class.
  • Handler Adapter calls the appropriate controller. org.springframework.web.servlet.mvc.method.annotation.RequestMappingHandlerAdapter is used. RequestMappingHandlerAdapter class calls the method of handler class (Controller) selected by HandlerMapping.
  • HandlerInterceptor to perform actions before handling, after handling or after completion (when the view is rendered) of a request.
  • Controller executes the business logic
  • Controller resolves the model and view to send to the user
  • The DispatcherServlet sends the view name to a ViewResolver to find the actual View to invoke. ViewResolvers resolves the view according to the implementation and configuration of the view, normally JSP org.springframework.web.servlet.view.InternalResourceViewResolver is used, Some other view resolvers are FreeMarkerViewResolver, TilesViewResolver, ThymeleafViewResolver, BeanNameViewResolver etc
  • Now the DispatcherServlet will pass the model object to the View to render the result.


Thursday 30 April 2020

SOLID Principle

SOLID Principle

  • The principles are from Robert "Uncle Bob" Martin
  • Michael Feathers is credited with coming up with the SOLID acronym
    • S = Single Responsibility Principle
    • O = Open/Closed Principle
    • L = Liskov Substitution principle
    • I = Interface Segregation Principle
    • D = Dependency Inversion Principle

Why?


  • OOP does not always lead to quality software
  • Poor dependency management leads to code that is brittle, fragile, and hard to change
  • Proper dependency management leads to quality code that is easy to maintain.
  • The 5 principles focus on dependency management
The one thing you can always count on in software engineering is CHANGE, no matter how well you design an application over time an application must grow and change or it will die.

Single Responsibility Principle

  • Every Class should have a single responsibility.
  • There should never be more than one reason for a class to change.
  • Your classes should be small. No more than a screen full of code.
  • Avoid ‘god’ classes.
  • Split big classes into smaller classes.
You can avoid these problems by asking a simple question before you make any changes: What is the responsibility of your class/component?

If your answer includes the word “and”, you’re most likely breaking the single responsibility principle. Then it’s better to take a step back and rethink your current approach.

Example: please follow the github link with bad and good example. explanation is class comment.


Real world example:
  • Java Persistence API (JPA) specification. defines a standardized way to manage data persisted in a relational database by using the object-relational mapping concept.
  • Spring Data Repository
  • Logging

Open/Closed Principle

  • Your classes should be open for extension but closed for modification
  • You should be able to extend a classes behavior, without modifying it.
  • Use private variables with getters and setters - ONLY when you need them.
  • Use abstract/interface base classes
  • Design should be ploymorphic to allow different implementations which you can easily substitute without changing the code that uses them
Example: please follow the github link with bad and good example. explanation is class comment.


Liskov Substitution Principle

  • By Barbara Liskov, in 1998
  • Objects in a program would be replaceable with instances of their subtypes WITHOUT altering the correctness of the program.
  • Violations will often fail the “Is a” test.
  • A Square “Is a” Rectangle
  • However, a Rectangle “Is Not” a Square
  • Can most usually be recognized by a method that does nothing, or even can’t be implemented.
  • The solution to these problems is a correct inheritance hierarchy/ correct interface
  • If it looks like a Duck, Quacks like a Duck but needs batteries. You probably Have the wrong abstraction.
Example: please follow the github link with bad and good example. explanation is class comment.


Interface Segregation Principle

  • No matter what should never be forced to implement an interface that it does not use or the client should never be obliged to depend on any method, which is not used by them.
  • Make fine grained interfaces that are client specific
  • Many client specific interfaces are better than one “general purpose” interface
  • Keep your components focused and minimize dependencies between them
  • Changing one method in a class should not affect classes that don't depend on
  • Notice relationship to the Single Responsibility Principle?
  • ie avoid ‘god’ interfaces
Example: please follow the github link with bad and good example. explanation is class comment.

Dependency Inversion Principle

  • Abstractions should not depend upon details
  • Details should depend upon abstractions
  • Important that higher level and lower level objects depend on the same abstract interaction
  • Able to change an implementation easily without altering the high level code.
  • This is not the same as Dependency Injection - which is how objects obtain dependent objects
Example: please follow the github link with bad and good example. explanation is class comment.

Some of other design principles
  • Encapsulate what varies ( identify the aspect of your application that vary and separate them from what stays the same)
  • Program to an interface not an implementation
  • Favor composition over inheritance ( HAS- A can better than IS - A)
  • Composition gives you a lot more flexibility. Not only does it let you encapsulate a family of algorithms into their own set of classes, but it also lets you change behavior at runtime as long as the object you are composing with implements correct behavior interface.

Friday 7 February 2020

Docker in a nutshell

Docker is a platform or ecosystem around creating and running containers.

Docker has two components 
             Docker cli:  is the docker client. tool that we are going to issue command.
             Docker server: Docker Daemon tool that is responsible for creating images, running
             containers etc

What is container ?
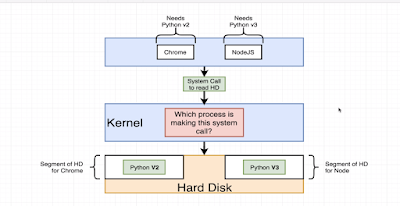
  • Two containers do not share their filesystem. no sharing of data between them.
  • Namespaces/segmenting Isolating resources per process or group of process
  • Control groups(cgroups) Limit amount of resources used per process


Life cycle of a container:

It has two steps, create a image and start the container from that image.
  • Create a container:  docker create <image name>
  • Start a container:     docker start -a <container id> // -a option means give me the output
When a container is create and started and if you want to run it again with docker start, you can not override the default startup command.

Image: Single file with all the dependencies and config required to run a program. File system snapshot. very specific set of files. when we run docker, images turns into a container


Docker some basic commands:

docker run = docker create + docker start

$docker create <image name>
$ docker start -a <container id>          
// -a option means give me the output

$docker ps                                          
// to list all the currently running container
$docker ps --all                                   
// list all the container that created, its like history

$docker system prune                         
// delete  all the containers from docker daemon.

$docker logs <container id>                 
// getting all the logs that container generated

$docker stop  <container id> 
// stopping container, sigterm signals to stop and clean up

$docker kill  <container id> 
// sigkill, kill the process right now

$docker rm <image name>

$docker attach <contanierId> 
// helps to get access to container's stdin, stdout, stderr

$docker image ls 
// to see list of all docker images on your system

Execute an additional command in a running container

$docker exec -it <containerid> <command> 
// it parameter allows to input
// get into the container and run command as you can not run command from host computer.

Example:
first command: $docker run redis
second command: $docker exce -it <container-id> redis-cli

How to open terminal/shell inside a container
$docker exec -it <container-id> sh
$docker run -it busybox sh 
// you can open terminal at the time of starting your container.

$docker run -d redis
// -d option for background run , daemon

Creating a Docker File:
  • Specify a base image
  • Run some commands to install additional programs
  • Specify a command to run on container startup
FROM -> RUN -> CMD

The naming convention for a docker file is "Dockerfile"
A sample Dockerfile

#Use a base docker image
FROM node:alpine

#download and install a dependency
WORKDIR /usr/app
COPY ./package.json ./
RUN npm install
COPY ./ ./

#start up command
CMD ["npm", "start"]


Two steps to run a docker file. 

  • Building the Dockerfile to create an image
  • Running the Image to run a container

$docker build . 
// it will output an id
$docker run <build image id>

Building docker image with a name:

$docker build -t <docker id, user name in docker hub>/<name of the image>:latest .
// -t indicates tag or name
$docker run  <docker id, user name in docker hub>/<name of the image>

With docker commit create image from a container:
$docker run -it alpine sh
$apk add --update redis

$docker ps // get id of the container
$docker commit -c 'CMD ["redsi-sever"]' <id container>
$docker run "new container id"

Push docker image to docker hub:
$docker push <tag name of the image>:version

If you run docker in detach mode, you may execute the below command
$docker inspect <image name>


Problem might face working with docker script first time
  • Make sure to use the right base docker image
  • Make sure you saved the file name as Dockerfile
  • When you run docker build command make sure to use . operator at the end of the command
  • Container file system is completely isolated. So make sure to copy your working directory code to docker file system. 
            use 
            WORKDIR /usr/app 
            and COPY ./ ./
  • Once you run web application using docker, you will not direct access to it using the port you assigned. As it is running on its own container. A port mappings needs to be set so that you can access the web application. 
$docker run -p 8080:8080 <imageid>
$docker run -it <docker id>/<image name> sh
//you can look inside the container

What is docker compose?
  • Separate CLI that gets installed along with Docker
  • Used to start up multiple docker containers at the same time
  • Automates some of the long winded arguments we are passing to 'docker run'
docker run <myimage> docker-compose up
docker build .
docker run <myimage>
docker-compose up --build

Launch in background: $docker-compose up -d
// -d for running in background
Stop containers:         $docker-compose down

$docker-compose status
//run this command inside of directory containing docker compose file:
$docker-compose ps
//run this command inside of directory containing docker compose file:

Running docker file with a custom file name:
$docker build -f dockerfile.dev .

How to change source code and reflect the change inside the docker container instead of building docker image every time? Docker volume is an option.

Docker volume: instead of copying put the reference to local machine filesystem and container filesystem

$docker run -p 3000:3000  -v pwd:/app CONTAINER_ID // windows
$docker run -p 3000:3000 -v ${pwd}:/app CONTAINER_ID

Example:
$docker run -p 3000:3000 -v $(pwd):/app <image id>
$docker run -p 3000:3000 -v app/node_modules -v $(pwd):/app CONTAINER_ID
// -v /app/node_modules means don't map with local

Equivalent docker-compose file of the above:

version: '3'
services:
    web:
        build:
            context: .
            dockerfile: Dockerfile.dev
        ports: 
            - "3000:3000"
        volumes: 
            - /app/node_modules
            - .:/app

how to restart if for some error inside the container:

Restart policies:

  • "no" : Never attempt to restart this. Container if it stops or crashes
  • always: if this container stops for any reason always attempt to restart it
  • on-failure: only restart if the container stops with an error code
  • unless-stopped: always restart unless we forcibly stop it.
add in docker-compose.yml under service node, restart : always/"no"/on-failure/unless-stopped